swiftでTableView上に表示するセルを自分好みにカスタマイズする
お疲れ様です。Gakuです。
最近スマフォを買い戻した(2年間ピッチで戦ってました)ので、これを機にiphoneアプリ開発を始めました。
とりあえず、もっとも良く使うであろうTableViewの勉強を2日間かけてやったので、その時の備忘録を掲載します。
具体的にはTableView上に載せるセルを自分好みにカスタマイズするということをやってみました。
完成形は以下のような感じです。
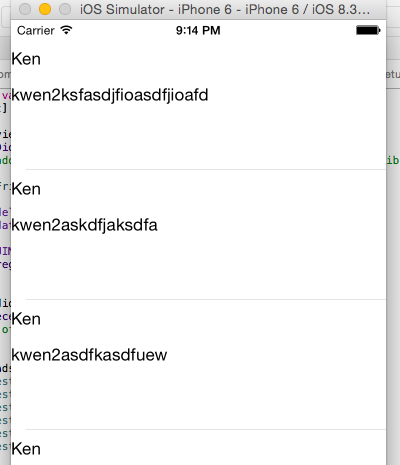
ラベル2つ貼っただけの簡単な構成。
ラベル以外でもいろいろできるので、とりあえず勉強がてらここからスタートすることにしました。
プロジェクトはSingle View Applicationで作成します。
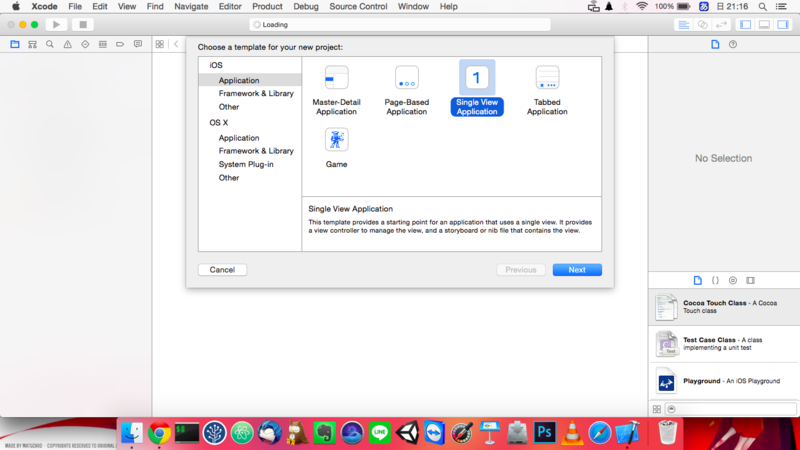
プロジェクト情報はこんな感じ
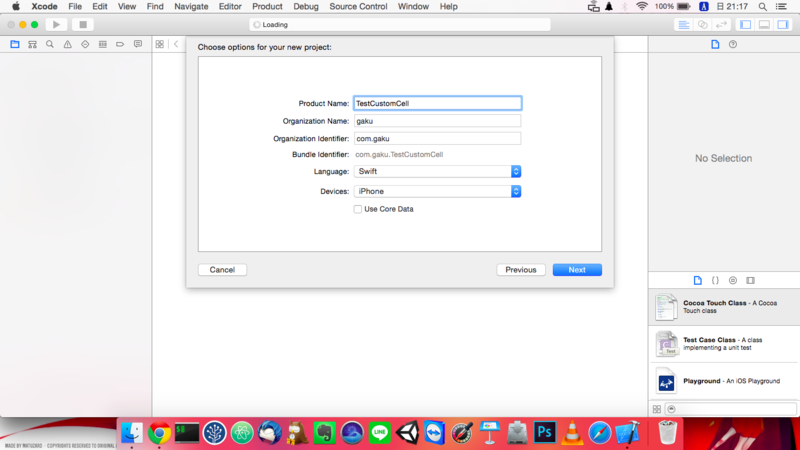
デスクトップあたりにプロジェクトを保存します。
Main.storyboard
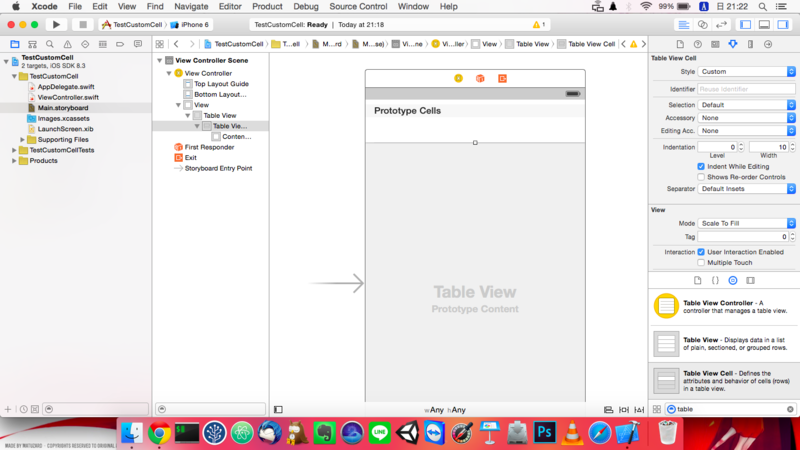
Viewを編集していきます。
構成としては
TableViewの上にTableViewCellを載せるだけです。
こんな感じ
CustomCell
次にセルをカスタマイズするためのファイル、CustomCellを作成し編集していきます。
TestCustomCellフォルダの上で右クリックしNewFile
iOS/SourceにあるCocoaTouchSourceを選択します。
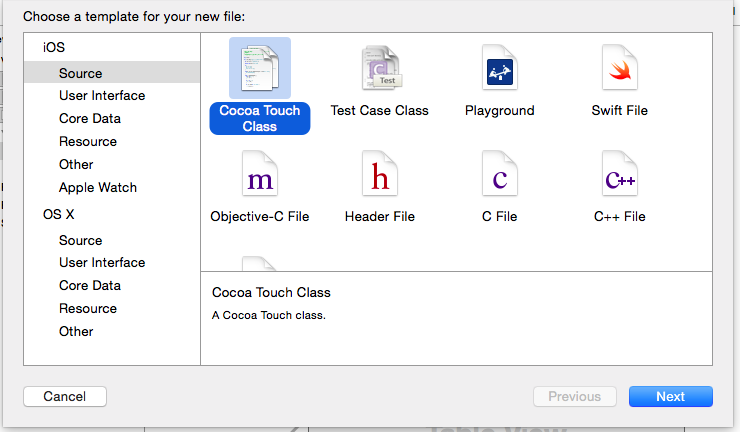
こんな感じで作成
Also create XIB fileにチェックを入れることをお忘れなく。

CustomCell.swiftとCustomCell.xibファイルが作成されたと思います。
CustomCell.xibを開いてCellの編集をします。
今回は簡単に2つのラベルを載せるだけの構成で編集。
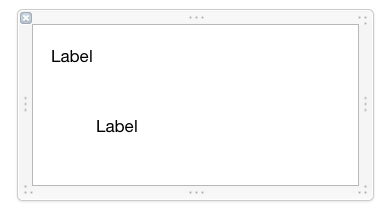
次にCustomCell.swiftを編集していきます。
作成した2つのLabelを関連付けます。(この作業重要)
ラベルを右クリックしてドラッグドロップで指定の場所へ関連付ければOK
こんな感じ
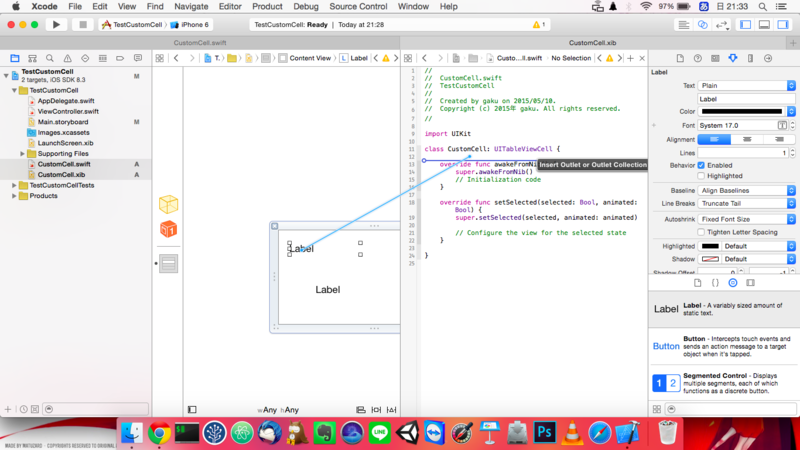
この作業がわからなくて半日はまった。。テキストベースの解説が多いので本当にわからないです。はい
Nameにはlabel1、label2を指定します。
この作業が終わったら以下のようにファイルを編集します。
import UIKit

class CustomCell: UITableViewCell {

    @IBOutlet weak var label1: UILabel!
    @IBOutlet weak var label2: UILabel!
    override func awakeFromNib() {
        super.awakeFromNib()
        // Initialization code
    }

    override func setSelected(selected: Bool, animated: Bool) {
        super.setSelected(selected, animated: animated)

        // Configure the view for the selected state
    }

    func setCell(test :Test) {
        self.label1.text = test.label1
        self.label2.text = test.label2
    }
}
Test.swingの作成
メンバクラスのTest.swingを作成します。
Swift Fileを選択して、「Test」で保存します
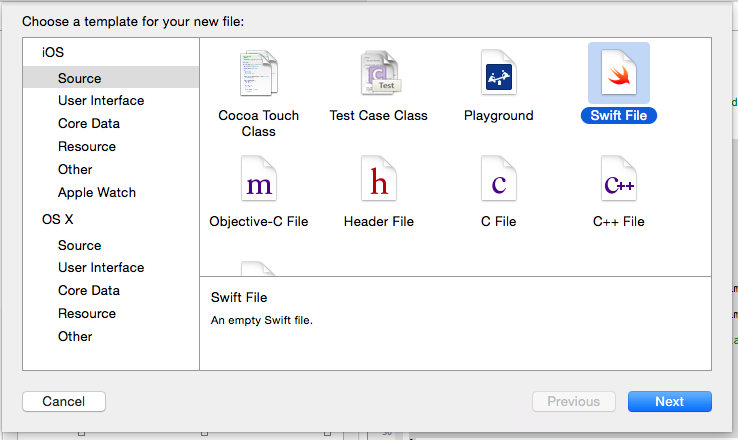
ソースは以下のように編集
import Foundation

class Test : NSObject{
    var label1:String
    var label2:String

    init(label1:String,label2:String){
        self.label1 = label1
        self.label2 = label2
    }
}
ViewControl.swift
CustamCellの編集でLabelの関連付けを行った手順で、
TableViewの関連を追加します。
NameはTableViewとします。
そしたら以下のように編集します。
import UIKit

class ViewController: UIViewController,UITableViewDataSource,UITableViewDelegate {

    @IBOutlet weak var tableView: UITableView!
    var Tests:[Test] = [Test]()

    override func viewDidLoad() {
        super.viewDidLoad()
        // Do any additional setup after loading the view, typically from a nib.

        self.setupFriends()

        tableView.delegate = self
        tableView.dataSource = self

        var nib = UINib(nibName: "CustomCell", bundle: nil)
        tableView.registerNib(nib, forCellReuseIdentifier: "Cell")
    }

    override func didReceiveMemoryWarning() {
        super.didReceiveMemoryWarning()
        // Dispose of any resources that can be recreated.
    }

    func setupFriends() {
        var f1 = Test(label1: "Ken", label2:"kwen2ksfasdjfioasdfjioafd")
        var f2 = Test(label1: "Ken", label2:"kwen2askdfjaksdfa")
        var f3 = Test(label1: "Ken", label2:"kwen2asdfkasdfuew")
        var f4 = Test(label1: "Ken", label2:"kwen2ksfasdjfioasdfjioafd")
        var f5 = Test(label1: "Ken", label2:"kwen2askdfjaksdfa")
        var f6 = Test(label1: "Ken", label2:"kwen2asdfkasdfuew")

        Tests.append(f1)
        Tests.append(f2)
        Tests.append(f3)
        Tests.append(f4)
        Tests.append(f5)
        Tests.append(f6)
    }

    func tableView(tableView: UITableView, numberOfRowsInSection section:Int) -> Int {
        return Tests.count
    }

    func tableView(tableView: UITableView, cellForRowAtIndexPath indexPath: NSIndexPath) -> UITableViewCell {
        var cell = tableView.dequeueReusableCellWithIdentifier("Cell") as? CustomCell

        //cell中身セット(引数 セル、indexPath)
        cell?.setCell(Tests[indexPath.row])

        return cell!
    }

}
UITableViewDataSource,UITableViewDelegateを継承している点を忘れずに。
実行してみたらセルがカスタマイズされて表示されていることがわかると思います。
終わり。
■ひとりごと
swiftむずかしいけど、とりあえずTableViewの編集の仕方が理解出来たし、
なんとかやっていけそうな気がします。
何より、実機で動くアプリが作れる楽しさを久しぶりに感じている今日このごろ。
さて、何作ろうかな〜(´・ω・`)
■参考文献
http://smileapps.sakura.ne.jp/blg/?p=745
【swift】オシャなCustomCellを設定する【CoffeeNote開発記】 - 凸ろぐ
jQueryプラグイン作ってみた

お疲れ様です。
railsをHerokuへUPしてみる
Herokuは無料だし、料金置いとけば強い味方だと感じたので
railsアプリを作成してHerokuへUPしてみた
■構築環境
vageant
CentOS6.5(64bit)
mysql
とりあえずrailsプロジェクト作成
$ rails new HerokuTest -d mysql
■herokuのtoolbelt導入
$ wget -qO- https://toolbelt.heroku.com/install.sh | sh
パス通す
echo 'PATH="/usr/local/heroku/bin:$PATH"' >> ~/.zshrc
source ~/.zshrc
■Herokuでアプリケーションの器を作成する
作成して下さい!
■herokuへデプロイする
とりあえずlogin
$ heroku login
作成したプリケーションへ移動する
$ cd myapp/
■Herokuの登録
以下のコマンドで登録する
$ git init
$ heroku git:remote -a herokutestbygaku
■mysqlの導入
herokuのaddonからmysqlを入れる
ClearDB MySQL Database | Add-ons | Heroku
クレジットカードの登録を求められるので登録する
登録したら再度addonを登録
Added cleardb:ignite to herokutestbygaku (Free)
のメッセージが出ればOK
コンソールで以下を叩くとmysqlの情報が得られる
heroku config | grep CLEARDB_DATABASE_URL
以下のような形でmysql→mysql2にして設定する
heroku config:set DATABASE_URL='mysql2://bccb22aa30be2f:1dcbedf7@us-cdbr-iron-east-01.cleardb.net/heroku_2b6a6be13d8a6b9?reconnect=true'
■ローカル環境の設定
rails sでアクセスするとActiveRecord::NoDatabaseError
でエラーが出るのでDBを作成する
create database HerokuTest_development;
■デプロイ
herokuはプロダクション環境なので、初期ページが出ない
そのためTopページを設定(routing設定)してUPする
rake assets:precompile RAILS_ENV=production
デプロイする(コマンドに関してはHerokuのアプリケーションのデプロイ方法に習う)
$ git add .
$ git commit -am "初期Herokuデプロイ"
$ git push heroku master
デプロイ完了!(´・ω・`)
■アクセスしてみる
Herokuのセッティング画面へ移動する
Domain部分のURLコピってアクセス
僕のURLはこれ
herokutestbygaku.herokuapp.com
————————————————————
■既にGitがある&sourcetreeで管理したい場合
コードブレイクで管理、herokuは公開用みたいな感じにしたい場合
$ git remote add heroku git@heroku.com:your_app_name.git
# 確認
$ git remote -v
# 削除したければ下記
$ git remote rm your_app_name
このままではsource treeでエラーになるのでsshkeyも登録する
ssh-keygen -C 'your@email' -t rsa -f filename
heroku keys:add
以後、sourcetreeにherokuのブランチが出るが、
デプロイはコマンドで行うこと
(どうしてもsorcetreeできない。。。)
初回デプロイは怒られるので、
怒られたら以下のコマンドを
git pull heroku master
■一言
herokuいいねheroku!
って思ってたけど、使ってみると重い気がする。
まだまだ使い方が分かってないからかもしれないけど、、、
初心者にrails教える時か、もしくは本気で運用する時には良いかもと思った。
初級者、上級者用ですな。
最低限、運用するために月6000円ぐらいかかるのは高い。。。
当分VPNでがんばるわ。
ただ、UIかっけえし、サーバ構築しなくていいしで
スピード感はあるな〜って思った。
CentOS6.5(64bit)にMeanを入れてみた
Meanを構築してみました。
まだ1回しか構築してないので、ご参考程度に
とりあえず、vagrantとvartualBoxは導入済みのこと(そこらへんで探せばいろいろ出てくるので頑張れ)
vagrant initからスタートします。
MeanのVagrantファイルフォルダ作って
$ vagrant init CentOS6.5
$ vagrant up
■Vagrantファイルの編集
共有フォルダを作成(ローカル)
以下vagrantファイルの設定(ご参考までに)--------------------------------------------------------
# -*- mode: ruby -*-
# vi: set ft=ruby :

# Vagrantfile API/syntax version. Don't touch unless you know what you're doing!
VAGRANTFILE_API_VERSION = "2"

Vagrant.configure(VAGRANTFILE_API_VERSION) do |config|
  # All Vagrant configuration is done here. The most common configuration
  # options are documented and commented below. For a complete reference,
  # please see the online documentation at vagrantup.com.

  # Every Vagrant virtual environment requires a box to build off of.
  config.vm.box = "CentOS6.5"

  # Disable automatic box update checking. If you disable this, then
  # boxes will only be checked for updates when the user runs
  # `vagrant box outdated`. This is not recommended.
  # config.vm.box_check_update = false

  # Create a forwarded port mapping which allows access to a specific port
  # within the machine from a port on the host machine. In the example below,
  # accessing "localhost:8080" will access port 80 on the guest machine.
  # config.vm.network "forwarded_port", guest: 80, host: 8080
  config.vm.network "forwarded_port", guest: 3000, host: 3000
  config.vm.network "forwarded_port", guest: 80, host: 80
  config.vm.network "forwarded_port", guest: 443, host: 443

  # Create a private network, which allows host-only access to the machine
  # using a specific IP.
  config.vm.network "private_network", ip: "192.168.33.10"

  # Create a public network, which generally matched to bridged network.
  # Bridged networks make the machine appear as another physical device on
  # your network.
  # config.vm.network "public_network"
  config.vm.synced_folder "~/Documents/Mean", "/home/vagrant/mean_project"

  # If true, then any SSH connections made will enable agent forwarding.
  # Default value: false
  # config.ssh.forward_agent = true

  # Share an additional folder to the guest VM. The first argument is
  # the path on the host to the actual folder. The second argument is
  # the path on the guest to mount the folder. And the optional third
  # argument is a set of non-required options.
  # config.vm.synced_folder "../data", "/vagrant_data"

  # Provider-specific configuration so you can fine-tune various
  # backing providers for Vagrant. These expose provider-specific options.
  # Example for VirtualBox:
  #
  # config.vm.provider "virtualbox" do |vb|
  #   # Don't boot with headless mode
  #   vb.gui = true
  #
  #   # Use VBoxManage to customize the VM. For example to change memory:
  #   vb.customize ["modifyvm", :id, "--memory", "1024"]
  # end
  #
  # View the documentation for the provider you're using for more
  # information on available options.

  # Enable provisioning with CFEngine. CFEngine Community packages are
  # automatically installed. For example, configure the host as a
  # policy server and optionally a policy file to run:
  #
  # config.vm.provision "cfengine" do |cf|
  #   cf.am_policy_hub = true
  #   # cf.run_file = "motd.cf"
  # end
  #
  # You can also configure and bootstrap a client to an existing
  # policy server:
  #
  # config.vm.provision "cfengine" do |cf|
  #   cf.policy_server_address = "10.0.2.15"
  # end

  # Enable provisioning with Puppet stand alone.  Puppet manifests
  # are contained in a directory path relative to this Vagrantfile.
  # You will need to create the manifests directory and a manifest in
  # the file default.pp in the manifests_path directory.
  #
  # config.vm.provision "puppet" do |puppet|
  #   puppet.manifests_path = "manifests"
  #   puppet.manifest_file  = "site.pp"
  # end

  # Enable provisioning with chef solo, specifying a cookbooks path, roles
  # path, and data_bags path (all relative to this Vagrantfile), and adding
  # some recipes and/or roles.
  #
  # config.vm.provision "chef_solo" do |chef|
  #   chef.cookbooks_path = "../my-recipes/cookbooks"
  #   chef.roles_path = "../my-recipes/roles"
  #   chef.data_bags_path = "../my-recipes/data_bags"
  #   chef.add_recipe "mysql"
  #   chef.add_role "web"
  #
  #   # You may also specify custom JSON attributes:
  #   chef.json = { mysql_password: "foo" }
  # end

  # Enable provisioning with chef server, specifying the chef server URL,
  # and the path to the validation key (relative to this Vagrantfile).
  #
  # The Opscode Platform uses HTTPS. Substitute your organization for
  # ORGNAME in the URL and validation key.
  #
  # If you have your own Chef Server, use the appropriate URL, which may be
  # HTTP instead of HTTPS depending on your configuration. Also change the
  # validation key to validation.pem.
  #
  # config.vm.provision "chef_client" do |chef|
  #   chef.chef_server_url = "https://api.opscode.com/organizations/ORGNAME"
  #   chef.validation_key_path = "ORGNAME-validator.pem"
  # end
  #
  # If you're using the Opscode platform, your validator client is
  # ORGNAME-validator, replacing ORGNAME with your organization name.
  #
  # If you have your own Chef Server, the default validation client name is
  # chef-validator, unless you changed the configuration.
  #
  #   chef.validation_client_name = "ORGNAME-validator"
end
————————————————————
基本#無い部分を編集すれば良い
一旦再起動
$ vagrant halt
$ vagrant up
$ vagrant ssh
lsコマンドでフォルダができていると思う
そのフォルダがローカルと仮想で共有されるフォルダになる
■npmの導入
とりあえずスーパユーザに
$ su
pass:vagrant
epelリポジトリを追加して、yumコマンドを強化(64bit版) *32bit版は知らね
$ rpm -ivh http://ftp.riken.jp/Linux/fedora/epel/6/x86_64/epel-release-6-8.noarch.rpm
$ yum install nodejs npm --enablerepo=epel
適当にy打ってインストール
■Meanの導入
$ npm install -g mean-cli
■gruntの導入
$ npm install -g grunt-cli
■MongoDBの導入
$ vi /etc/yum.repos.d/mongodb.repo
で以下を記述しセーブ-----------------
[mongodb]
name=MongoDB Repository
baseurl=http://downloads-distro.mongodb.org/repo/redhat/os/x86_64/
gpgcheck=0
enabled=1
$ sudo yum install -y mongodb-org
ここでとりあえずvagrant再起動
exit>exit>vagrant halt>vagrant up>vagrant ssh>su>pass:vagrant>cd mean_project/
■適当にアプリ作ってみる
$ mean init NewTechApp
? What would you name your mean app? >Enter
? Do you prefer grunt or gulp as a taskrunner? (Use arrow keys)
❯ grunt
   gulp
gruntでEnter
何か絵が出てきたら成功
■アプリ立ち上げてみる
$ cd NewTechApp
$ npm install
$ grunt
ここで落ちるはず
bowerとかいう代物のjqueryが足りてないらしい
ということでインストール
$ npm install -g bower
$ bower install jquery
以下のエラーが出る場合
events.js:72
        throw er; // Unhandled 'error' event
              ^
Error: getaddrinfo ENOTFOUND
    at errnoException (dns.js:37:11)
    at Object.onanswer [as oncomplete] (dns.js:124:16)
で、まだエラーが出る。ローカルのIPを
設定してあげないとダメみたい
$ vi config/env/development.js
debug: 'true',
hostname: '0.0.0.0', // 追加する
mongoose: {
(´・ω・`)<むずい
■一言
参考文献なさすぎ、エラー出過ぎ。
死にかけた。が、一応初期画面までは構築できた。
多分、構築の方もかなりキツイぞこれ。。。
mongo、AngularJS、node.jsを別々に勉強してやった方が
いいのではないかと思ってきてる。。。
これを使ってrails以上に「良い!」って思える日は来るのでしょうか。。。
■参考文献
MEAN(MongoDB,Express,Angular.js,Node.js)環境を構築して簡単なアプリを作るまで
http://bibourock.hatenablog.jp/entry/2014/10/22/MEAN%EF%BC%88MongoDB,Express,Angular_js,Node_js%EF%BC%89%E7%92%B0%E5%A2%83%E3%82%92%E6%A7%8B%E7%AF%89%E3%81%97%E3%81%A6%E7%B0%A1%E5%8D%98%E3%81%AA%E3%82%A2%E3%83%97%E3%83%AA%E3%82%92%E4%BD%9C
node.jsをyumでインストールする(centos6.5)
http://qiita.com/you21979@github/items/4efd9fc4363573191b5c
CentOS6.5にMongoDBをインストールする
http://qiita.com/nownabe/items/123a8fd04ff5252b3036
Vagrantで起動したCentOSにmean環境構築して起動まで
http://qiita.com/balmychan/items/56f4526a7b47ad92cdf2
mysqlの導入
mysql構築なんて腐るほどあると思うけど、
自分なりに構築した備忘録
■mysqlの導入
yum install mysql-server
yum install mysql-devel
文字コードをUTF8にする
rails new 名前 -d mysql
でmysqlが適用アプリケーションが作成できる
■文字コードの変更
mv /etc/my.cnf /etc/my.cnf.d
vi /etc/my.cnf
[mysqld]
datadir=/var/lib/mysql
socket=/var/lib/mysql/mysql.sock

character-set-server=utf8

# Disabling symbolic-links is recommended to prevent assorted security risks
symbolic-links=0

# Settings user and group are ignored when systemd is used (fedora >= 15).
# If you need to run mysqld under a different user or group,
# customize your systemd unit file for mysqld according to the
# instructions in http://fedoraproject.org/wiki/Systemd
user=mysql

# Semisynchronous Replication
# http://dev.mysql.com/doc/refman/5.5/en/replication-semisync.html
# uncomment next line on MASTER
;plugin-load=rpl_semi_sync_master=semisync_master.so
# uncomment next line on SLAVE
;plugin-load=rpl_semi_sync_slave=semisync_slave.so

# Others options for Semisynchronous Replication
;rpl_semi_sync_master_enabled=1
;rpl_semi_sync_master_timeout=10
;rpl_semi_sync_slave_enabled=1

# http://dev.mysql.com/doc/refman/5.5/en/performance-schema.html
;performance_schema

#
# include all files from the config directory
#
#!includedir /etc/my.cnf.d

[mysql]
default-character-set=utf8

[mysqldump]
default-character-set=utf8
■確認
mysql -u root -p
■全ての権限を持つユーザの作成
mysql> GRANT ALL ON *.* TO ユーザID@"localhost"IDENTIFIED BY "パスワード";
mysql> FLUSH PRIVILEGES;
■ユーザの確認
mysql> SELECT host,user FROM mysql.user;
■起動時立ち上がるように設定
sudo chkconfig --level 35 mysqld on
■一言
地味に文字コードの設定ではまるので書き溜めとく
CentOS6.5にrailsを構築する(2014/11/27gakuさん最新版)
VagrantとVirtualBoxは導入済みのこと
■Vagrantの設定
・ボックスの登録
vagrant box add centos6_4 http://developer.nrel.gov/downloads/vagrant-boxes/CentOS-6.4-x86_64-v20130731.box
・vagrantfileの作成
vagrant init centos6_4
・vagrantで仮想PCを起動
vagrant up
・SSH接続
vagrant ssh
これでとりあえず仮想PC環境は整う。
vagrant最強。。。
Vagrantfileを開いて設定しておく。#コメントを外して、以下に変更し保存
ネットワーク設定
config.vm.network "forwarded_port", guest: 3000, host: 3000
共有フォルダ設定
config.vm.synced_folder "~/CentOS6_5ShareFolder", "/home/vagrant/rails_projects"
~/CentOS6_5ShareFolderがubuntuのフォルダ、/home/vagrant/rails_projectsが仮想PCのフォルダ
■rbenvの導入
ruby、RVM、Railsを導入する
とりあえず、SSHで仮想PCを操作できるようにする
・SSH接続
vagrant ssh
で、root権限で作業をする方が良さそうだったので切り替える
su
パスワード:vagrant
※何もいじってないなら「vagrant」がPW
・yumの最新版を取得
yum update
・gitのインストール(ここCentOS6.5だったらいらないかも)
epelリポジトリを追加(yumでgitをインストール出来るようにする)
//wgetがないって怒られるので
yum install wget
wget http://ftp.jaist.ac.jp/pub/Linux/Fedora/epel/6/x86_64/epel-release-6-8.noarch.rpm
rpm -ivh epel-release-6-8.noarch.rpm
yum install git
・rbenvのインストール
git clone https://github.com/sstephenson/rbenv.git ~/.rbenv
git clone https://github.com/sstephenson/ruby-build.git ~/.rbenv/plugins/ruby-build
echo 'export PATH="$HOME/.rbenv/bin:$PATH"' >> ~/.bash_profile
echo 'eval "$(rbenv init -)"' >> ~/.bash_profile
source ~/.bash_profile
rbenv --version
バージョン出たら成功
このままではrubyインストールで怒られる。
openSSLをインストールする必要があるので、以下のコマンドを実行
yum -y install openssl-devel
■rubyのインストール
まずはインストール可能なrubyのリストを取得
rbenv install --list
今回はruby2.1.0をインストールする。
rbenv install 2.1.0
インストールできたらシステム全体で使用するrubyバージョンを設定する
rbenv global 2.1.0 //これやらないと怒られる
・gemのアップデート
gem update --system
■Railsの導入
・Railsのインストールを行う。かなり時間がかかるので、焦らずゆっくり待とう。
※何も表示されないままが続きますが、そのうち終わります。
gem install --no-ri --no-rdoc rails
■railsの設定
プロジェクトを作成しようと思っても、sqliteねえよ!って怒られるので
以下のコマンドで入れる
yum install sqlite-devel
また、rails sでこけるのでnode.js入れる
sudo yum install nodejs
・railsアプリケーションを作成
rails new railstest
・確認
cd railstest
rails s
ブラウザでアクセスしてrails初期画面出れば完成
http://0.0.0.0:3000/
■一言
rubyのバージョン管理ツールでRVM使ってたんだけど、
今回新しくCentOS6.5でrails構築したら、「署名足りない」
とか怒られた。
前々からはまる点がRVMでいらいらしてたから、
今回はrbenvで構築してやった。
すんげえ簡単。しかも、フォルダ単位でruby切り替えれるし
(使う機会ないけど)悪い点がない。
■参考文献
rbenvのインストール
http://dev.classmethod.jp/server-side/language/build-ruby-environment-by-rbenv/
railsでproductionにする
公開してるサーバをdevelopにしてて、
「このままじゃだめだな〜」
って思ってproduction環境にしたら偉いことになった。
具体的にはjsとかcssとか全く読み込まれない感じ。
その時の対処方法
以下のコマンドを打ってプリコンパイルを毎回行わなければいけない
bundle exec rake assets:precompile RAILS_ENV=production
config/environments/production.rbのファイルの
config.serve_static_assets = false
をコメントアウトしてあげると治った
■参考文献
http://blog.livedoor.jp/maru_tak/archives/51247889.html